I decided to go with a fleur de lis design since I have a picture in my room that has a similar design and it would match well.You could do it with any design though, from flowers to designs for kids. You can buy little decals to use, or you can paint them yourself. I decided to paint them myself. I went onto Google images, typed in Fleur de lis, and a million designs came up. I looked through them and the minute I found one I liked, I would keep looking and find another that I like really well. Finally, it hit me. Why am I doing just one design? I decided to use my top 15 favorites. Why 15 you ask? That's how many hats I have, but the awesome thing is, I can just add more later when I get new hats!
I thought 3" would be a good height for each design, so I adjusted the image until it was the right size and then just traced it with tracing paper. It's pretty easy if you have a laptop, I just flatten out the computer and use masking tape to hold the paper to the screen, so it doesn't shift mid-trace. Once I had all the designs traced out, I cut around each one so I could tape them to the wall where I wanted to paint them.
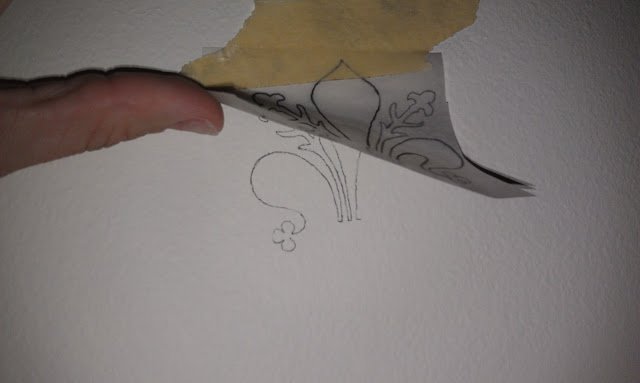
The way I transfer them on the wall is, I trace them from the computer with a graphite pencil. Since the design can be reversed and still look the same, you just tape the tracing to the wall using masking tape with the side you traced on facing the wall. While it's taped up, you trace over the design again on the opposite side and the outline from the original trace will transfer to the wall, like below.
At this stage if you decide you want to move the image, no problem, it's just pencil, so it will come off. Just make sure you have them where you want them before you move on to the next step, because once that step is complete, there is no turning back!
Next, I went over my outlines with a fine sharpie marker. You could just start painting here, but I like to do this so I don't have smudges all over the wall. Keep in mind, when you are tracing the pencil image on the wall, of you hand placement. I'm right handed so when I start tracing the image on the wall, I start on the left side. If I start on the right side, there is a chance that once I start to move to the left, the pencil from the right side will get on my hand and it will put pencil smudges on the wall. Either that or I will be washing my hands constantly. I have white walls and I don't want to add an extra step of cleaning them to the process. However, when I outline the design with sharpie, I start on the right side of the design so that when I'm working on the left I don't smear the outline on the wall. I start on the left side also when painting so I don't get my hand in the paint. That's not confusing at all, right? So after all the placement of the designs on the wall, I trace over them in sharpie.
Once the designs are all outlined in sharpie, this is where I start painting. I went to Home Depot and bought a small, sample jar of paint for $3 and had them make it black.
Then, I painted the designs.
After that, it was time to put the hooks in. I found an 18 pack of hooks at target for $4.
I followed the directions on the back of the package and drilled a 3/32 pilot hole below each design. You can position the hook wherever you like under the design. I put some space between mine, because most of my hats have brims and I wanted to be able to see the design above the hat.
Now you can put in the hooks, they just twist right in...
That's it! It only took me a couple days to do, but that was because I farted around while I was doing it and I painted them myself. It wouldn't take nearly as long if you used decals. Here is the finished wall...
I've been pretty lackadaisical with this blog and I've done some fun projects that I need to put on here. My chain purse holder (in the pic above) is one of them. That was super easy, and I love it!


